I know it has been a while since I posted anything on my blog. This time of year is pretty hectic for me. I need to get the school year closed out before I can really get ready for summer. One of my favorite things to do in the summer is to go camping, my whole family loves it because we like to rough it. What a great coincidence that Imaginisce has just released a super cute camping collection, just in time for my summer. To celebrate and to make up my absence to my wonderful readers, I would love to send you some of the Happy Camper I have in my stash. All you have to do is leave me a comment about what you like to do in the summer and I will randomly draw a lucky winner from the comments a little bit later this week.
There are some great chipboard pieces in the collection like this sentiment and the cute little tree. Here you can see that I added some unique stitching with my We R Memory Keepers Sew Easy Stitch Piercer. It is a little roller that punches the holes in the paper, so all you have to do is follow the pattern with your needle and floss.
I love this photo of my husband, his father and our son. Three generations is pretty darn special. My father-in-law selected the matching shirts especially for this occasion.
I also love the bright fun colors in this collection. They are perfect for these photos of my son camping last summer. I cut the large tree with my Cricut Expression and added some of the Imaginisce Silver Glam Rocks to look like all the rain we experienced on our trip.
I couldn't resist making this card with the little fire that comes with the collection. Sometimes all you need is a little sense of humor to get through the day.
As I said above, please leave me a comment about your favorite summer activity and I will randomly select someone to receive some of the Brand New Imaginisce Happy Camper.
Thank you so much for stopping by -
Monday, May 30, 2011
Sunday, May 15, 2011
Tiny Princess Cardset & Tutorial
Are there are a lot of babies being born in your life like there are in mine? In the last few months I have gotten both a niece and a nephew and it seems like my family is exponentially growing. If you are like me and on the hook for a few gifts...how about a quick and easy project to create a set of baby gift cards that are on hand and ready to go. The Little Yellow Bicycle Tiny Princess or Baby Saurus collections are the perfect materials for creating this custom set of cards that will wow all of the new mommies in your life.
This card was made with a unique template for creating the cute little onesie, which is available for download at the end of this post. It also includes the gorgeous Tiny Princess Favorite Pieces cardstock stickers and Jewel Pieces. The warm, bright colors really draw a lot of attention to the card and will bring a smile to your friends and family.
It was so easy to create one card, that a set of four cards was a simple addition. Now I have a few cards ready to send with a gift and no need to stop by the store. The video tutorial below explains each of the steps in the process for creating these cards and there is also a PDF with the complete written instructions. Please feel free to download the template that I used to create the onesie and sentiment on my cards, or download the blank template to create your very own sentiment.
And if you're expecting your own bundle of joy, it's easy to adapt these cards into adorable and original baby announcements! Just use the blank onesie template provided (below), and make it your own!
Here are the instructions, and the templates
Download InstructionsTICardSet_Qualman
Download OnesieTemplate
Download OnesieTemplateBlank
Thank you so much for stopping by -
Wednesday, May 11, 2011
NEW Roly Rosies at Imaginisce
It's Roly Rosie week at Imaginisce and the design team is showcasing ideas for how to use these unique and fun little flowers. I opted for an off the page project and picked up a very inexpensive veil at Walmart and then used the Roly Rosie neutrals and Pop-Up Posies neutrals to create this beautiful veil topper modeled by my sweet little girl. She is a professional to be sure - LOL.
Below are the neutral colored Roly Rosies that come in a variety of colors. I used the music note paper to make the flower centers for my project. I love how soft and beautiful the flowers look and the texture the print adds to the project.
These are the neutral colored Pop-Up Posies. They are very easy to put together and come in a variety of colors and sizes. The large size is perfect to use with the Roly Rosies as centers.
If I know Imaginisce, and I think I do...I bet there is some kind of giveaway on the blog today with these gorgeous embellishments. Go have a looksie for yourself at other project ideas from the design team.
Thank you so much for stopping by -
Monday, May 9, 2011
More from Simple Stories
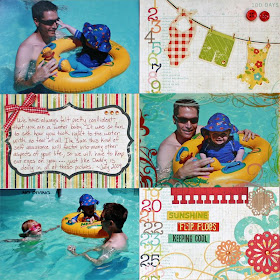
Warm weather is just around the corner and Simple Stories has a wonderful new mid release collection called 100 Days of Summer that perfectly compliments all things summer. Doesn't my little boy make you want to jump in the pool? Or better yet, doesn't this collection make you want to go to the pool just to shoot photos to scrapbook on this gorgeous paper??? Now we are talking! Please visit the Simple Stories Blog for two sketches to go with this project :)
I cut these fun little banners out of one of the 4 x 6 cards in the collection and pop-dotted them to add dimension and make them stand out more on the page.
The colors in the papers are the perfect blend of bright combined with a soft, worn base color that just makes the 100 Days of Summer collection pop.
I added more of the "everyday" photos from this event using the page elements from the collection. I am really excited about how the elements beautifully coordinate with a variety of divided page protector sheets. Below is a sketch that is specifically designed for the Simple Stories 4x6 cards and other collection pieces like the 6x12 page elements. I spent time on my traditional page and then "simply" mirrored some of the papers and elements on the second page. You can see the same numbers and clotheslines on both of my pages.
But wait...look what happens when you put them together...
It's a match made in heaven and I really love how easy it is to create two pages with the Simple Stories system. And it all goes into my album - Simple as That
Thank you so much for stopping by -
Sunday, May 1, 2011
Simply Happy about joining Simple Stories
I'm very excited to share that I am joining the new design team at Simple Stories! I happened to walk into their booth at CHA in January and my jaw simply hit the floor. They have gorgeous product and a unique system for making scrapbooking easy. I love the concept and feel very fortunate to be included in this new adventure.
I created this page about a trip my family took in February with the brand new Destinations Collection and oh my is this a collection full of rich colors that will knock your socks off. All of the elements in the collection just flow together perfectly.
There are some very fun and high quality cardstock stickers that coordinate with all of the collections. I simply pop-dotted for added effect.
Now for the fun part...
I created this page using the Simple Stories element pieces that are designed to fit perfectly with coordinating divided page protector pockets that are available in a wide variety of formats and sizes. I added a title element with some of the cardstock alphabet stickers along with an extra 4x6 photo and then simply inserted the trimmed element piece, along with my photos, into the divided page protector pockets. It doesn’t get any easier than that! Read HERE to see how this system works.
Check out what they look like together! The traditional page took me about an hour and a half to create and the coordinating divided page protector sheet took me about 20 minutes. I am so happy to have a complete memory without the time it would take me to create two traditional pages. Now see what it looks like in my album... all done.
Simple Stories is announcing the brand new team today and they have a giveaway on their blog! Be sure to stop by and tell them I sent you...
Take care - Liz